|
This document describes the advanced plan controls.
It is recommended to avoid using them, if the same task
can be done with the plan edit wizards.
Plan controls are available on the first page that opens
as you enter the admin Control Panel:

- ON/OFF - turning the plan off will not remove
accounts or plan settings, but will just block signup for
it for all users including admin himself until he enables
it again.
- Resources - include or
exclude specific resources in this plan. If you are not
well familiar with the system, it is highly recommended
to use the Plan Edit Wizard
unless this is one of admin-level plans that cannot be modified
via the wizard.
- Settings -
configure template locations. This page is reserved
for Hosts of America development and debugging and should not be
used in production control panels.
- Access - set which users
have permissions to create accounts under this plan.
- Copy - create a copy of this
plan. You may need this option to create a new plan based
on the selected plan.
- Delete (version 2.05 or higher)
- delete a plan.
Resources
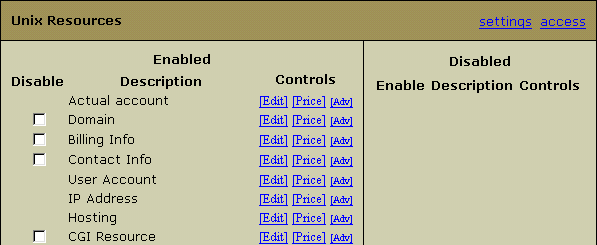
If you are well familiar with the resource hierarchy, you
can use the Resources page to enable or disable resources
in the selected plan:

Some resources cannot be disabled
(like User Account, IP Address, etc. in the example
above). These are the so-called "required" or "service"
resources vitally important for the correct operation
of the plan (version 2.09.5 and higher).
To enable or disable a specific resource, check it in the
correspondent column and click the Change button. This
resource will become available or unavailable to all users
under this plan.
- [Edit] - Configure basic settings
for resources.
- Price - Set general price scheme. See
here for details.
- Adv - Configure advanced settings.
Settings
This page is used to configure locations for plan-specific templates:

- Plan Name: this is the only place where you can edit
the name of the plan.
- Default Template defines the page that opens when a user
logs into the control panel. To specify a custom page, enter
the file name and the path relative to the template directory.
If your template works incorrectly, you can remove it to
return to the system defaults.
- Template Directory specifies the name of the directory
with templates used by this specific plan. If a template is not found
in this directory, the system takes generic Hosts of America template with the
same filename.
For example, you have a plan called 'SPECIAL', where the Template
Directory parameter is set to special/ and the current skin is set
to 'No Menu'. When the system tries to find, for instance, the
design/login.html template, it will first scan the
~cpanel/shiva/shiva-templates/nomenu/replacements/special/design/
directory, and if fails, it moves on to the
~cpanel/shiva/shiva-templates/nomenu/design/
directory in search of this template.
As seen from the above, the Template Directory parameter is NOT used for
creating custom templates. Instead, when a new plan is added to the
system, plan-specific templates are placed in this directory.
Besides that, when you customize Hosts of America templates, you should
check the replacements/ directory of each design location for
plan-specific templates and customize them if necessary.
- menuId: in Hosts of America, each plan type has its own corresponding menu configuration.
These menu types are configured in the
/hsphere/local/home/cpanel/shiva/psoft/hsphere/menu.xml file.
We use the menuId variable to specify the menu type.
These are the standard menu types for the corresponding Hosts of America plan types:
unix - Unix plan;
admin - Admin plan;
ttadmin - Trouble Ticket Admin plan;
bill - Billing plan;
reseller - Reseller plan;
winduz - Windows plan;
real - Real Server plan;
mysql - MySQL Only plan;
email_only - E-Mail Only plan;
vps - VPS plan.
You can add your custom menu to menu.xml and specify the custom menuId in the
form to assign it to the plan. In menu.xml, you should add the new menudef tag:
<menudef id="custom_menuId">
...
</menudef>
Note: Menu customization should be done very carefully,
according to the
Left Menu Customization Guide!
WARNING:
If you set an incorrect value to menuId or leave this field empty in the form,
the left menu in your Control Panel won't show up!
Edit
Edit page allows you to set basic parameters for the plan:

- Max: set the maximum number of resource units a
user can buy under this plan.
Note: as for IP, you can set the 'Max' value only
to dedicated IPs.
- Removable: define whether the resource can be removed
by a user. Use this option to make sure this resource can
never be deleted under this plan.
- Addable: define whether the resource can be added
by a user under this plan.
- Custom Values: provide extra configuration parameters.
Don't add custom values unless you definitely know how to
use them.
Access
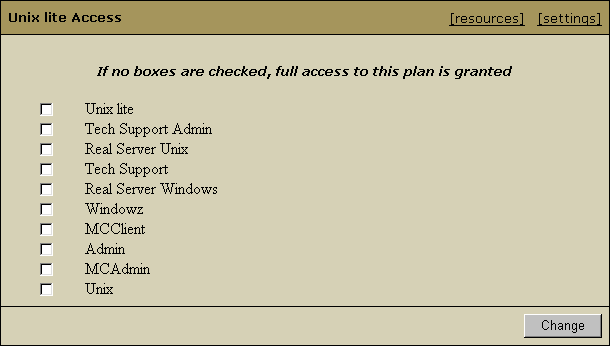
Access page allows you to set which users have permissions
to create accounts under this plan:

Here you can choose users who can create accounts under the
selected plan. The Admin plan, for example, should not be
available to any other users other than the administrator.
To grant permissions to plan users, check the boxes for this
plan in the list. For the Admin plan, only Admin box
should be checked. If no boxes are checked, this plan will
be available to all users, including those who are registering
accounts "from the street".
Copy
Alternatively to the Plan Creation Wizard, you can use this
feature to create custom plans based on
previously created plans.
To create a new plan, click Copy for the selected
plan sample. The newly created copy will appear in the plan
list. You can now modify it according to your needs via Plan
Edit Wizard or above discussed configuration tools.
Delete
Although deleting plans is quite a rare procedure (as plans
are essential part of the whole system), you may want to delete
needless or harshly created plans. To delete a plan, go to
the Plans page, Info menu and click the
Trash icon in the selected plan entry.
Warning: Deleted plans cannot be restored by any means!
Do not delete any of the system default plans because they
serve to create custom plans!
It is impossible to delete a plan if there is at the least
one account created under it. In other words only those plans
free of accounts can be deleted.
To see your deleted plans list, click the Deleted Plans link under the
System Plans chart on the Plans page, Info menu.
|